How to Build an Oracle Service
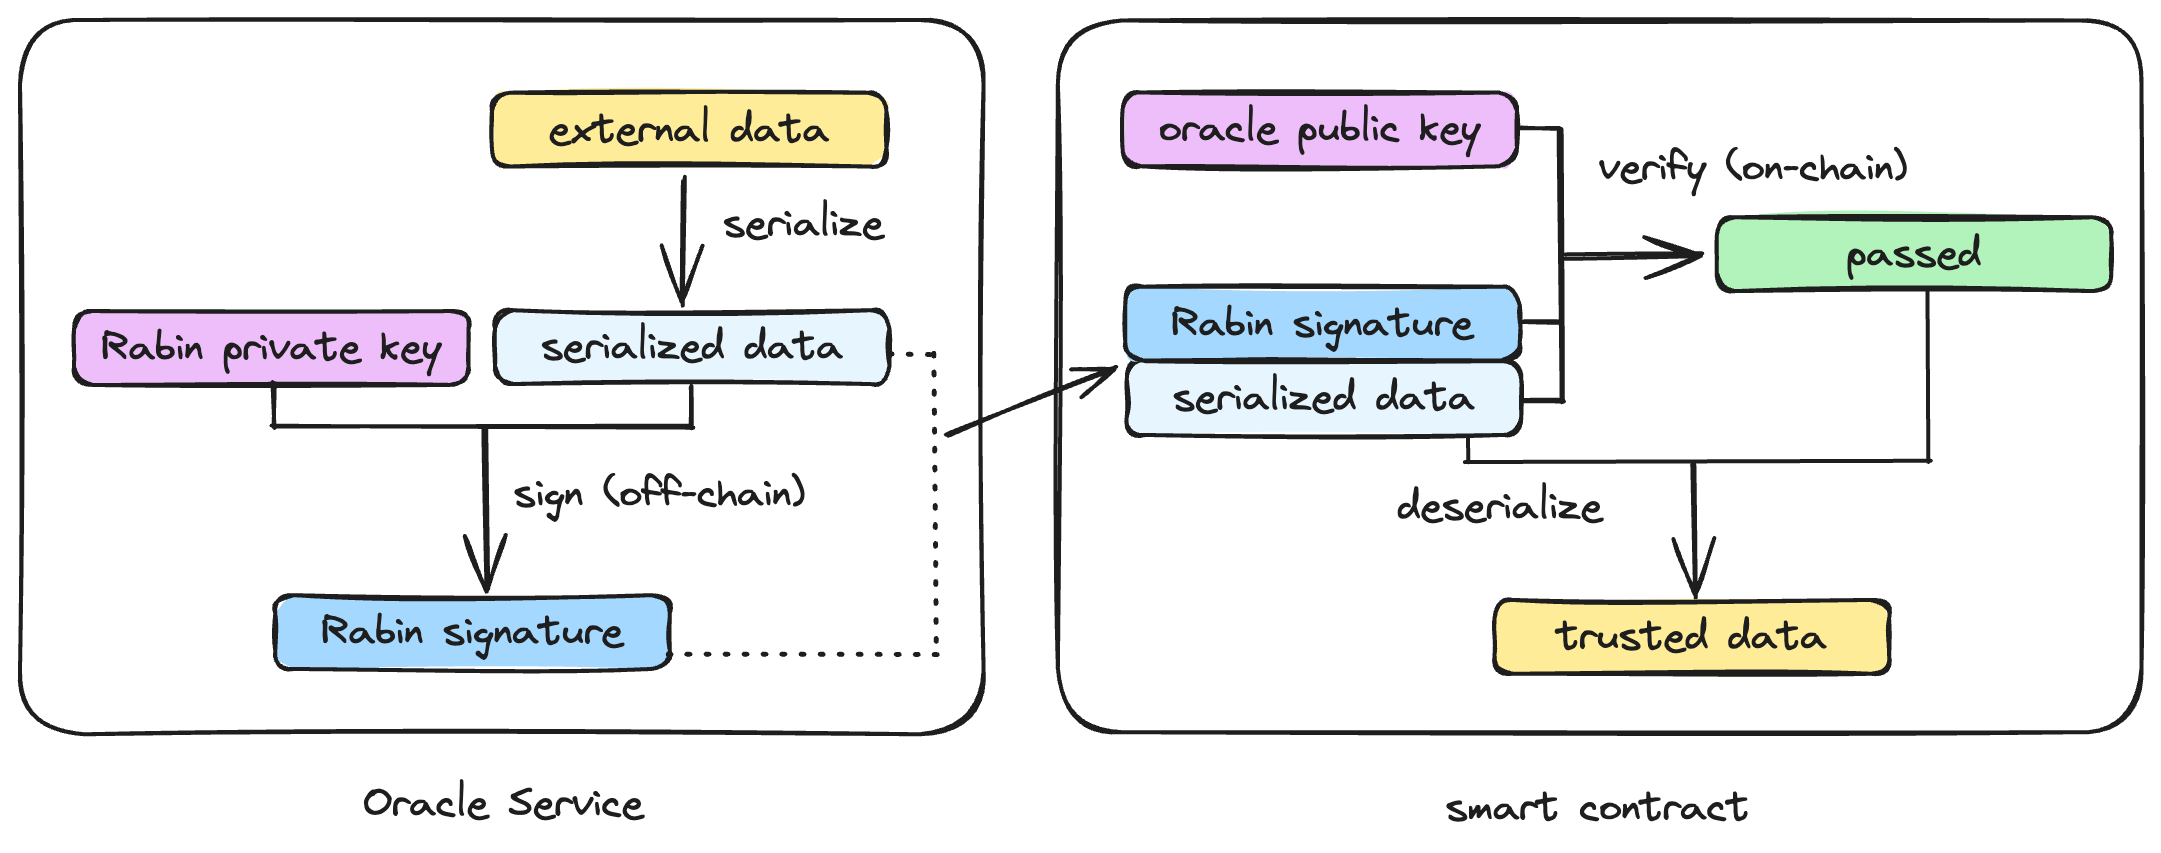
As described in this tutorial, a blockchain oracle is a third-party service or agent that provides external data to a blockchain network. It is a bridge between the blockchain and the external world, enabling smart contracts to access, verify, and incorporate data from outside the blockchain. Specifically, the oracle service provides external data along with a Rabin signature of the data, and the smart contract uses this data and verifies the signature before using it.
Rabin signature
Rabin signature is an alternative digital signature algorithm (DSA) to ECDSA used in Bitcoin. It has a beautiful asymmetry that signature generation is computationally expensive, but signature verification is cheap. Therefore, we choose to use Rabin signature to ensure the integrity of the external data provided by the oracle. When an oracle provides data, it will sign the data with its private key off chain. When the data is used by smart contracts, its signature is verified on chain, which is cheap. We do not use the builtin checkSig opcode here because it can only check signature against the transaction data, not arbitrary data.

In this section, we will introduce how to build your own oracle service. For the backend framework, we use NestJS to illustrate, but you are free to use any familiar framework to build the service. For the Rabin signature part, we have already implemented a library rabinsig, which can be imported and used directly.
The full complete code of this demo can be found in our GitHub repo. You can also refer to the code of WitnessOnChain, an open-sourced oracle service, for more details.
1. Scaffold the project
Run the following command to create a NestJS project.
npx @nestjs/cli new oracle-demo
Then install dependencies.
cd oracle-demo
npm install
npm install rabinsig
2. Generate signatures
An oracle may provide multiple pieces of data, each requiring a signature. We implement a common service, so that it can be reused and called in different places.
The class SigService will load and initialize a private key from ENVs. We add a method sign in this class, which takes one parameter dataBuffer representing the binary data to be signed.
import { Rabin, serialize } from 'rabinsig';

export class SigService {
  private rabin = new Rabin();
  // load and init Rabin private key from ENVs
  ...
  sign(dataBuffer: Buffer) {
    const dataHex = dataBuffer.toString('hex');
    const sig = this.rabin.sign(dataHex, this.privKey);
    return { data: dataHex, signature: serialize(sig) };
  }
}
3. Add APIs
Add a timestamp API
Too see how it works, we implement a simple timestamp API. We first get the current timestamp, then convert it to a 4 bytes Buffer in little-endian, and sign the structured data.
export function getTimestamp() {
  return Math.trunc(Date.now() / 1000);
}

@Get('/timestamp')
getTimestamp() {
  const timestamp = getTimestamp();
  const data = Buffer.concat([
    toBufferLE(V1Controller.MARKER.TIMESTAMP, 1), // api marker, 1 byte
    toBufferLE(timestamp, 4), // timestamp, 4 bytes LE
  ]);
  const sigResponse = this.rabinService.sign(data);
  return { timestamp, ...sigResponse };
}
The response of this API is as follows.
{
  "timestamp":1700596603,
  "data":"017b0b5d65",
  "signature":{
    "s":"4fe8bbcdf26...",
    "padding":"0000"
  }
}
For the smart contract, it is only necessary to focus on two parts: data and signature. It should only use and trust data when the signature verification passes.
API Marker
Note that the first byte in data is an identification marker, which not only indicates how the signed data is serialized, but also has a more important role in distinguishing data from different interfaces.
Without this marker, the smart contract cannot distinguish which interface the passed data actually comes from. When oracle has two interfaces that return signed data of the same length, the attacker can pass the data returned from another interfaces to the contract, potentially causing issues. Therefore, different APIs should use different marker values.
Add a coin price API
Here we use the OKX API to obtain a currency's price.
First, wrap the OKX API. Note how the method handles the value of price. Because it is inconvenient for the smart contract to handle float numbers, a variable decimal is introduced to convert the price value into an integer.
/**
 * @param tradingPair e.g. `BSV-USDT`, `BTC-USDC`, etc
 * @param decimal decimal of the returned price
 * @returns an integer representing the price of the trading pair, e.g. return 1234 with decimal 2 means 12.34
 */
async getOkxPrice(tradingPair: string, decimal: number) {
  return axios
    .get(`https://www.okx.com/api/v5/market/ticker?instId=${tradingPair}`)
    .then((r) => Math.trunc(r.data.data[0].last * 10 ** decimal));
}
Then implement the oracle API following the order of obtaining data, serializing it, and signing it.
@Get('price/:base/:query')
async getPrice(@Param('base') base: string, @Param('query') query: string) {
  // obtain data
  const tradingPair = `${query.toUpperCase()}-${base.toUpperCase()}`;
  const decimal = 4;
  const price = await this.v1Service.getOkxPrice(tradingPair, decimal);
  // serialize data
  const timestamp = getTimestamp();
  const data = Buffer.concat([
    toBufferLE(V1Controller.MARKER.PRICE, 1), // api marker, 1 byte
    toBufferLE(timestamp, 4), // timestamp, 4 bytes LE
    toBufferLE(price, 8), // price, 8 bytes LE
    toBufferLE(decimal, 1), // decimal, 1 byte
    Buffer.from(tradingPair), // trading pair
  ]);
  // sign data
  const sigResponse = this.rabinService.sign(data);
  return { timestamp, tradingPair, price, decimal, ...sigResponse };
}
Add more APIs
According to the previous introduction, you can add more APIs to your oracle as needed, such as obtaining BSV chain info, etc., which will not be covered here.
4. Use oracle data in a smart contract
In this tutorial, we introduce how to verify and use oracle data in smart contracts.
To verify signatures in smart contracts, we need to install the scrypt-ts-lib library.
npm install scrypt-ts-lib
Then add the contract under folder /src/contracts. Here we also use the PriceBet contract. You can refer to file priceBet.e2e-spec.ts for a complete test code.