Tutorial 5: Zero Knowledge Proofs
Overview
In this tutorial we will go over how to create a zero-knowledge proof (ZKP) and verify it on Bitcoin using sCrypt.
What are zk-SNARKS?
SNARK (zero-knowledge Succinct Non-interactive ARguments of Knowledge) is a type of ZKP that is amenable for blockchains. The generated proof is “succinct” and “non-interactive”: a proof is only a few hundred bytes and can be verified in constant time and within a few milliseconds, without needing to ask additional questions of the prover. Together, these properties make zk-SNARK especially suitable for blockchains, where on-chain storage and computation can be expensive and senders often go offline after sending a transaction.
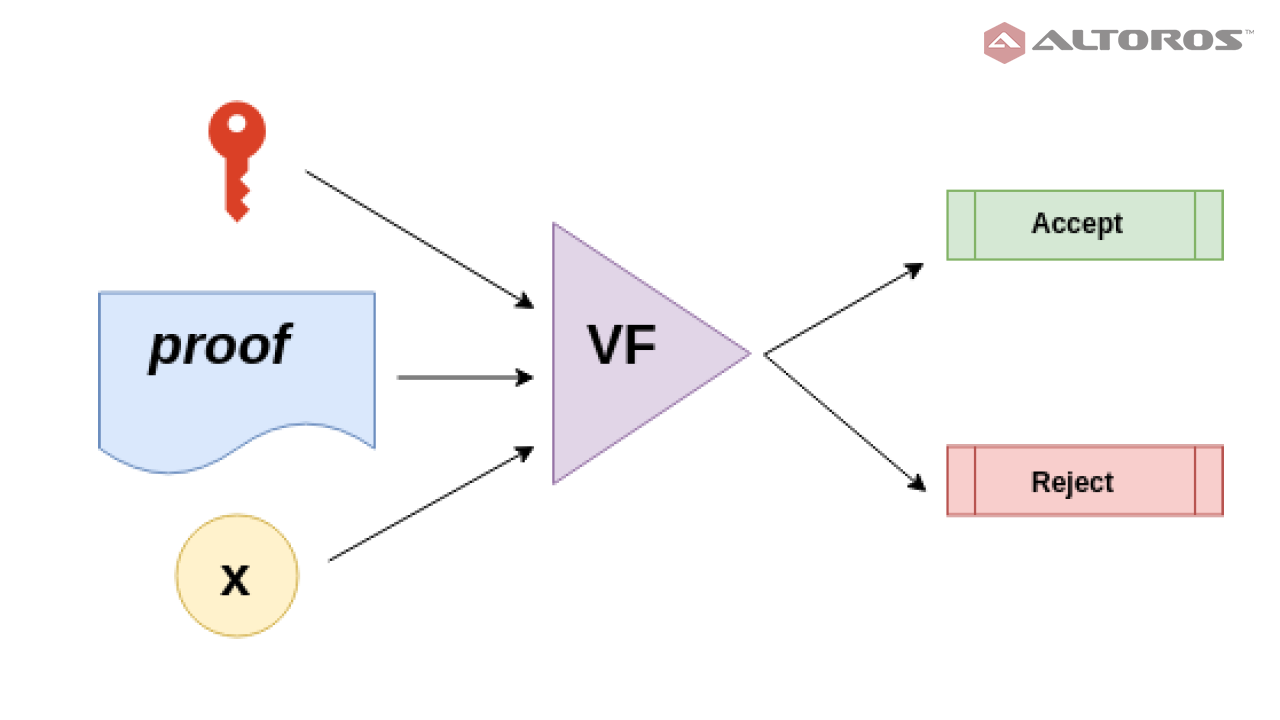
A proof is constructed off-chain by a prover who generates the proof using a secret input (often referred to as the "witness") and a public input. The prover can then use this proof as an input for an sCrypt smart contract, which can verify the validity of the proof using a verification key and the public input.
There are many tools for creating such proofs, ZoKrates and SnarkJS are among the most popular.
In this example we will use ZoKrates. It provides a python-like higher-level language for developers to code the computational problem they want to prove.
For a more comprehensive explanation of zk-SNARKS and how they work, we recommend reading this blog post.
Install ZoKrates
Run the following command to install released binaries:
curl -Ls https://scrypt.io/scripts/setup-zokrates.sh | sh -s -
or build from source:
git clone https://github.com/sCrypt-Inc/zokrates
cd ZoKrates
cargo +nightly build -p zokrates_cli --release
cd target/release
ZoKrates Workflow
1. Design a circuit
Create a new ZoKrates file named factor.zok with the following content:
// p, q are the factors of n
def main(private field p, private field q, field n) {
    assert(p * q == n);
    assert(p > 1);
    assert(q > 1);
    return;
}
This simple circuit/program proves one knows a factorization of an integer n into two integers, without revealing the factors. The circuit has two private inputs named p and q and one public input named n.
2. Compile the circuit
Compile the circuit with the following command:
zokrates compile -i factor.zok
This generates two files that encode the circuit in binary and human-readable format.
3. Setup
This generates a proving key and a verification key for this circuit.
zokrates setup
4. Calculate a witness
A proof attests that a prover knows some secret/private information that satisfies the original program. This secret information is called witness. In the following example, 7 and 13 are the witnesses, as they are factors of 91.
zokrates compute-witness -a 7 13 91
A file named witness is generated.
5. Creating a proof
The following command produces a proof, using both the proving key and the witness:
zokrates generate-proof
The resulting file proof.json looks like the following:
{
  "scheme": "g16",
  "curve": "bn128",
  "proof": {
    "a": [
      "0x0a7ea3ca37865347396645d017c7623431d13103e9107c937d722e5da15f352b",
      "0x040c202ba8fa153f84af8dabc2ca40ff534f54efeb3271acc04a70c41afd079b"
    ],
    "b": [
      [
        "0x0ec1e4faea792762de35dcfd0da0e6859ce491cafad455c334d2c72cb8b24550",
        "0x0985ef1d036b41d44376c1d42ff803b7cab9f9d4cf5bd75298e0fab2d109f096"
      ],
      [
        "0x265151afd8626b4c72dfefb86bac2b63489423d6cf895ed9fa186548b0b9e3f3",
        "0x301f2b356621408e037649d0f5b4ad5f4b2333f58453791cc24f07d5673349bf"
      ]
    ],
    "c": [
      "0x2b75a257d68763100ca11afb3beae511732c1cd1d3f1ce1804cbc0c26043cb6b",
      "0x2f80c706b58482eec9e759fce805585595a76c27e37b67af3463414246fbabbd"
    ]
  },
  "inputs": [
    "0x000000000000000000000000000000000000000000000000000000000000005b"
  ]
}
6. Export an sCrypt verifier
Using our version of ZoKrates, we can export a project template, which will contain a verifier for our circuit. Simply run the following command:
zokrates export-verifier-scrypt
This will create a directory named verifier, containing the project. Let's set it up. Run the following:
cd verifier && git init && npm i
Now the verifier is ready to be used. In the following section we will go over the code and show how to use it.
7. Run the sCrypt Verifier
In the generated project, let's open the file src/contracts/verifier.ts. This file contains an sCrypt smart contract, named Verifier, which can be unlocked by providing a valid ZK proof.
Under the hood it uses the SNARK library from src/contracts/snark.ts. This file includes an elliptic curve implementation along with a library that implements pairings over that elliptic curve and lastly the implementation of the proof verification algorithm. In our example the BN-256 elliptic curve is being used along with the Groth-16 proof system..
Let's take a look at the implementation of Verifier:
export class Verifier extends SmartContract {

    @prop()
    vk: VerifyingKey

    @prop()
    publicInputs: FixedArray<bigint, typeof N_PUB_INPUTS>,

    constructor(
      vk: VerifyingKey,
      publicInputs: FixedArray<bigint, typeof N_PUB_INPUTS>,
      ) {
        super(...arguments)
        this.vk = vk
        this.publicInputs = publicInputs
    }

    @method()
    public verifyProof(
        proof: Proof
    ) {
        assert(SNARK.verify(this.vk, this.publicInputs, proof))
    }

}
As we can see, the contract has two properties, namely the verification key and the value(s) of the public inputs to our ZK program.
The contract also has a public method named verifyProof. As the name implies it verifies a ZK proof and can be unlocked by a valid one. The proof is passed as a parameter. The method calls the proof verification function:
SNARK.verify(this.vk, this.publicInputs, proof)
The function takes as parameters the verification key, the public inputs and the proof. It's important to note that the proof is cryptographically tied to the verification key and thus must be a proof about the correct ZoKrates program (factor.zok).
The generated project will also contain a deployment script deploy.ts. Let's take a look at the code:
async function main() {
    await Verifier.loadArtifact()

    // TODO: Adjust the amount of satoshis locked in the smart contract:
    const amount = 100

    // TODO: Insert public input values here:
    const publicInputs: FixedArray<bigint, typeof N_PUB_INPUTS> = [ 0n ]

    let verifier = new Verifier(
        prepareVerifyingKey(VERIFYING_KEY_DATA),
        publicInputs
    )

    // Connect to a signer.
    await verifier.connect(getDefaultSigner())

    // Deploy:
    const deployTx = await verifier.deploy(amount)
    console.log('Verifier contract deployed: ', deployTx.id)
}

main()
We can observe that we need to adjust two things. First, we need to set the amount of satoshis we will lock into the deployed smart contract. The second thing is the public input value, i.e. the product of the secret factors. Let's set it to the value 91:
const publicInputs: FixedArray<bigint, typeof N_PUB_INPUTS> = [ 91n ]
Note also, that ZoKrates already provided us with the values of the verification key, that we created during the setup phase.
Now, we can build and deploy the contract. Simply run:
npm run deploy
The first time you run the command, it will ask you to fund a testnet address. You can fund it using our faucet.
After a successful run you should see something like the following:
Verifier contract deployed: 2396a4e52555cdc29795db281d17de423697bd5cbabbcb756cb14cea8e947235
The smart contract is now deployed and can be unlocked using a valid proof, that proves the knowledge of the factors for the integer 91. You can see the transaction using a block explorer.
Let's call the deployed contract. Let's create a file named call.ts with the following content:
import { DefaultProvider } from 'scrypt-ts'
import { parseProofFile } from './src/util'
import { Verifier } from './src/contracts/verifier'
import { Proof } from './src/contracts/snark'
import { getDefaultSigner } from './tests/utils/helper'
import { PathLike } from 'fs'

export async function call(txId: string, proofPath: PathLike) {
    await Verifier.loadArtifact()

    // Fetch TX via provider and reconstruct contract instance
    const provider = new DefaultProvider()
    const tx = await provider.getTransaction(txId)
    const verifier = Verifier.fromTx(tx, 0)

    // Connect signer
    await verifier.connect(getDefaultSigner())

    // Parse proof.json
    const proof: Proof = parseProofFile(proofPath)

    // Call verifyProof()
    const { tx: callTx } = await verifier.methods.verifyProof(
        proof
    )
    console.log('Verifier contract unlocked: ', callTx.id)
}

(async () => {
  await call('2396a4e52555cdc29795db281d17de423697bd5cbabbcb756cb14cea8e947235', '../proof.json')
})()
The function call will create the contract instance from the passed TXID and call its verifyProof method. The proof gets parsed from proof.json, which we already created in the section above.
Let's unlock our contract by running the following command:
npx ts-node call.ts
If everything goes as expected, we have now unlocked the verifier smart contract. You'll see an output similar to the following:
Verifier contract unlocked: 30127e0c340878d3fb7c165e2d082267eef2c8df79b5cf750896ef565ca7651d
Take a look at it using a block explorer.
Conclusion
Congratulations! You have successfully created a zk-SNARK and verified it on-chain!
If you want to learn how you can integrate zk-SNARKS into a fully fledged Bitcoin web application, take a look at our free course, which will teach you how to create a ZK Battleship game. Additionally, it teaches you to use snarkjs/circom.
To know more about ZKP, you can refer to this awesome list.