How to Deploy & Call a Contract
Core Concepts
After you've finished writing a contract, you can deploy and call it. But first, you should learn how a smart contract interacts with the blockchain. In this section, we will go over some fundamental concepts in detail.
Compile and Load Contract
First, compile the contract using the CLI:
npx @scrypt-inc/cli-btc compile
This will create an artifact json file of your contract in the /artifacts folder.
Next, call loadArtifact to load the json file, so you have a smart contract class ready to be instantiated.
import artifact from '../artifacts/mycontract.json'
MyContract.loadArtifact(artifact)
Covenant Instance
As explained in the Overview section, an sCrypt contract is based on the Bitcoin UTXO model. A covenant instance is an abstraction that represents a specific contract deployed on-chain, so you can use it to interact with the contract like a normal TypeScript object.
// construct a new instance of `MyContract`
let contract = new MyContract(...initArgs);
let covenant = Covenant.createCovenant(contract);
Provider
A Provider is an abstraction of a standard Bitcoin node that provides connection to the Bitcoin network, for read and write access to the blockchain.
sCrypt already has a few built-in providers:
DummyProvider: A mockup provider just for local tests. It does not connect to the Bitcoin blockchain and thus cannot send transactions.MempoolProvider: The default provider is the safest, easiest way to begin developing on Mempool API, and it is also robust enough for use in production. It can be used in testnet as well as mainnet.RPCProvider: The default provider is the safest, easiest way to begin developing on Bitcoin RPC API, and it is also robust enough for use in production. It can be used in testnet as well as mainnet.
You can initialize these providers like this:
let dummyProvider = new DummyProvider();

// testnet
let provider = new MempoolProvider('fractal-testnet');

// mainnet
let provider = new MempoolProvider('fractal-mainnet');


// rpc
let provider = new RPCProvider('http://127.0.0.1:8883', 'myWallet', 'username', 'password');
Signer
A Signer is an abstraction of private keys, which can be used to sign messages and transactions. A simple signer would be a single private key, while a complex signer is a wallet.
DefaultSigner
For testing purposes only, we have a built-in wallet called DefaultSigner. It can be created like this:
const keyPair = ECPair.makeRandom({
    network: toBitcoinNetwork('fractal-mainnet')
})
const signer = new DefaultSigner(keyPair);
Contract Deployment Transaction
A Bitcoin transaction is required when deploying a contract to the blockchain. The transaction should have an output, whose script is compiled from the contract. This output is known as a contract UTXO and the contract instance comes from this UTXO.
Contract Call Transaction
When you call a public method of a contract instance in a UTXO, a call transaction is needed. The transaction has an input that references to the UTXO and contains the script consisting of the method's arguments. We regard the contract instance goes to this transaction input.
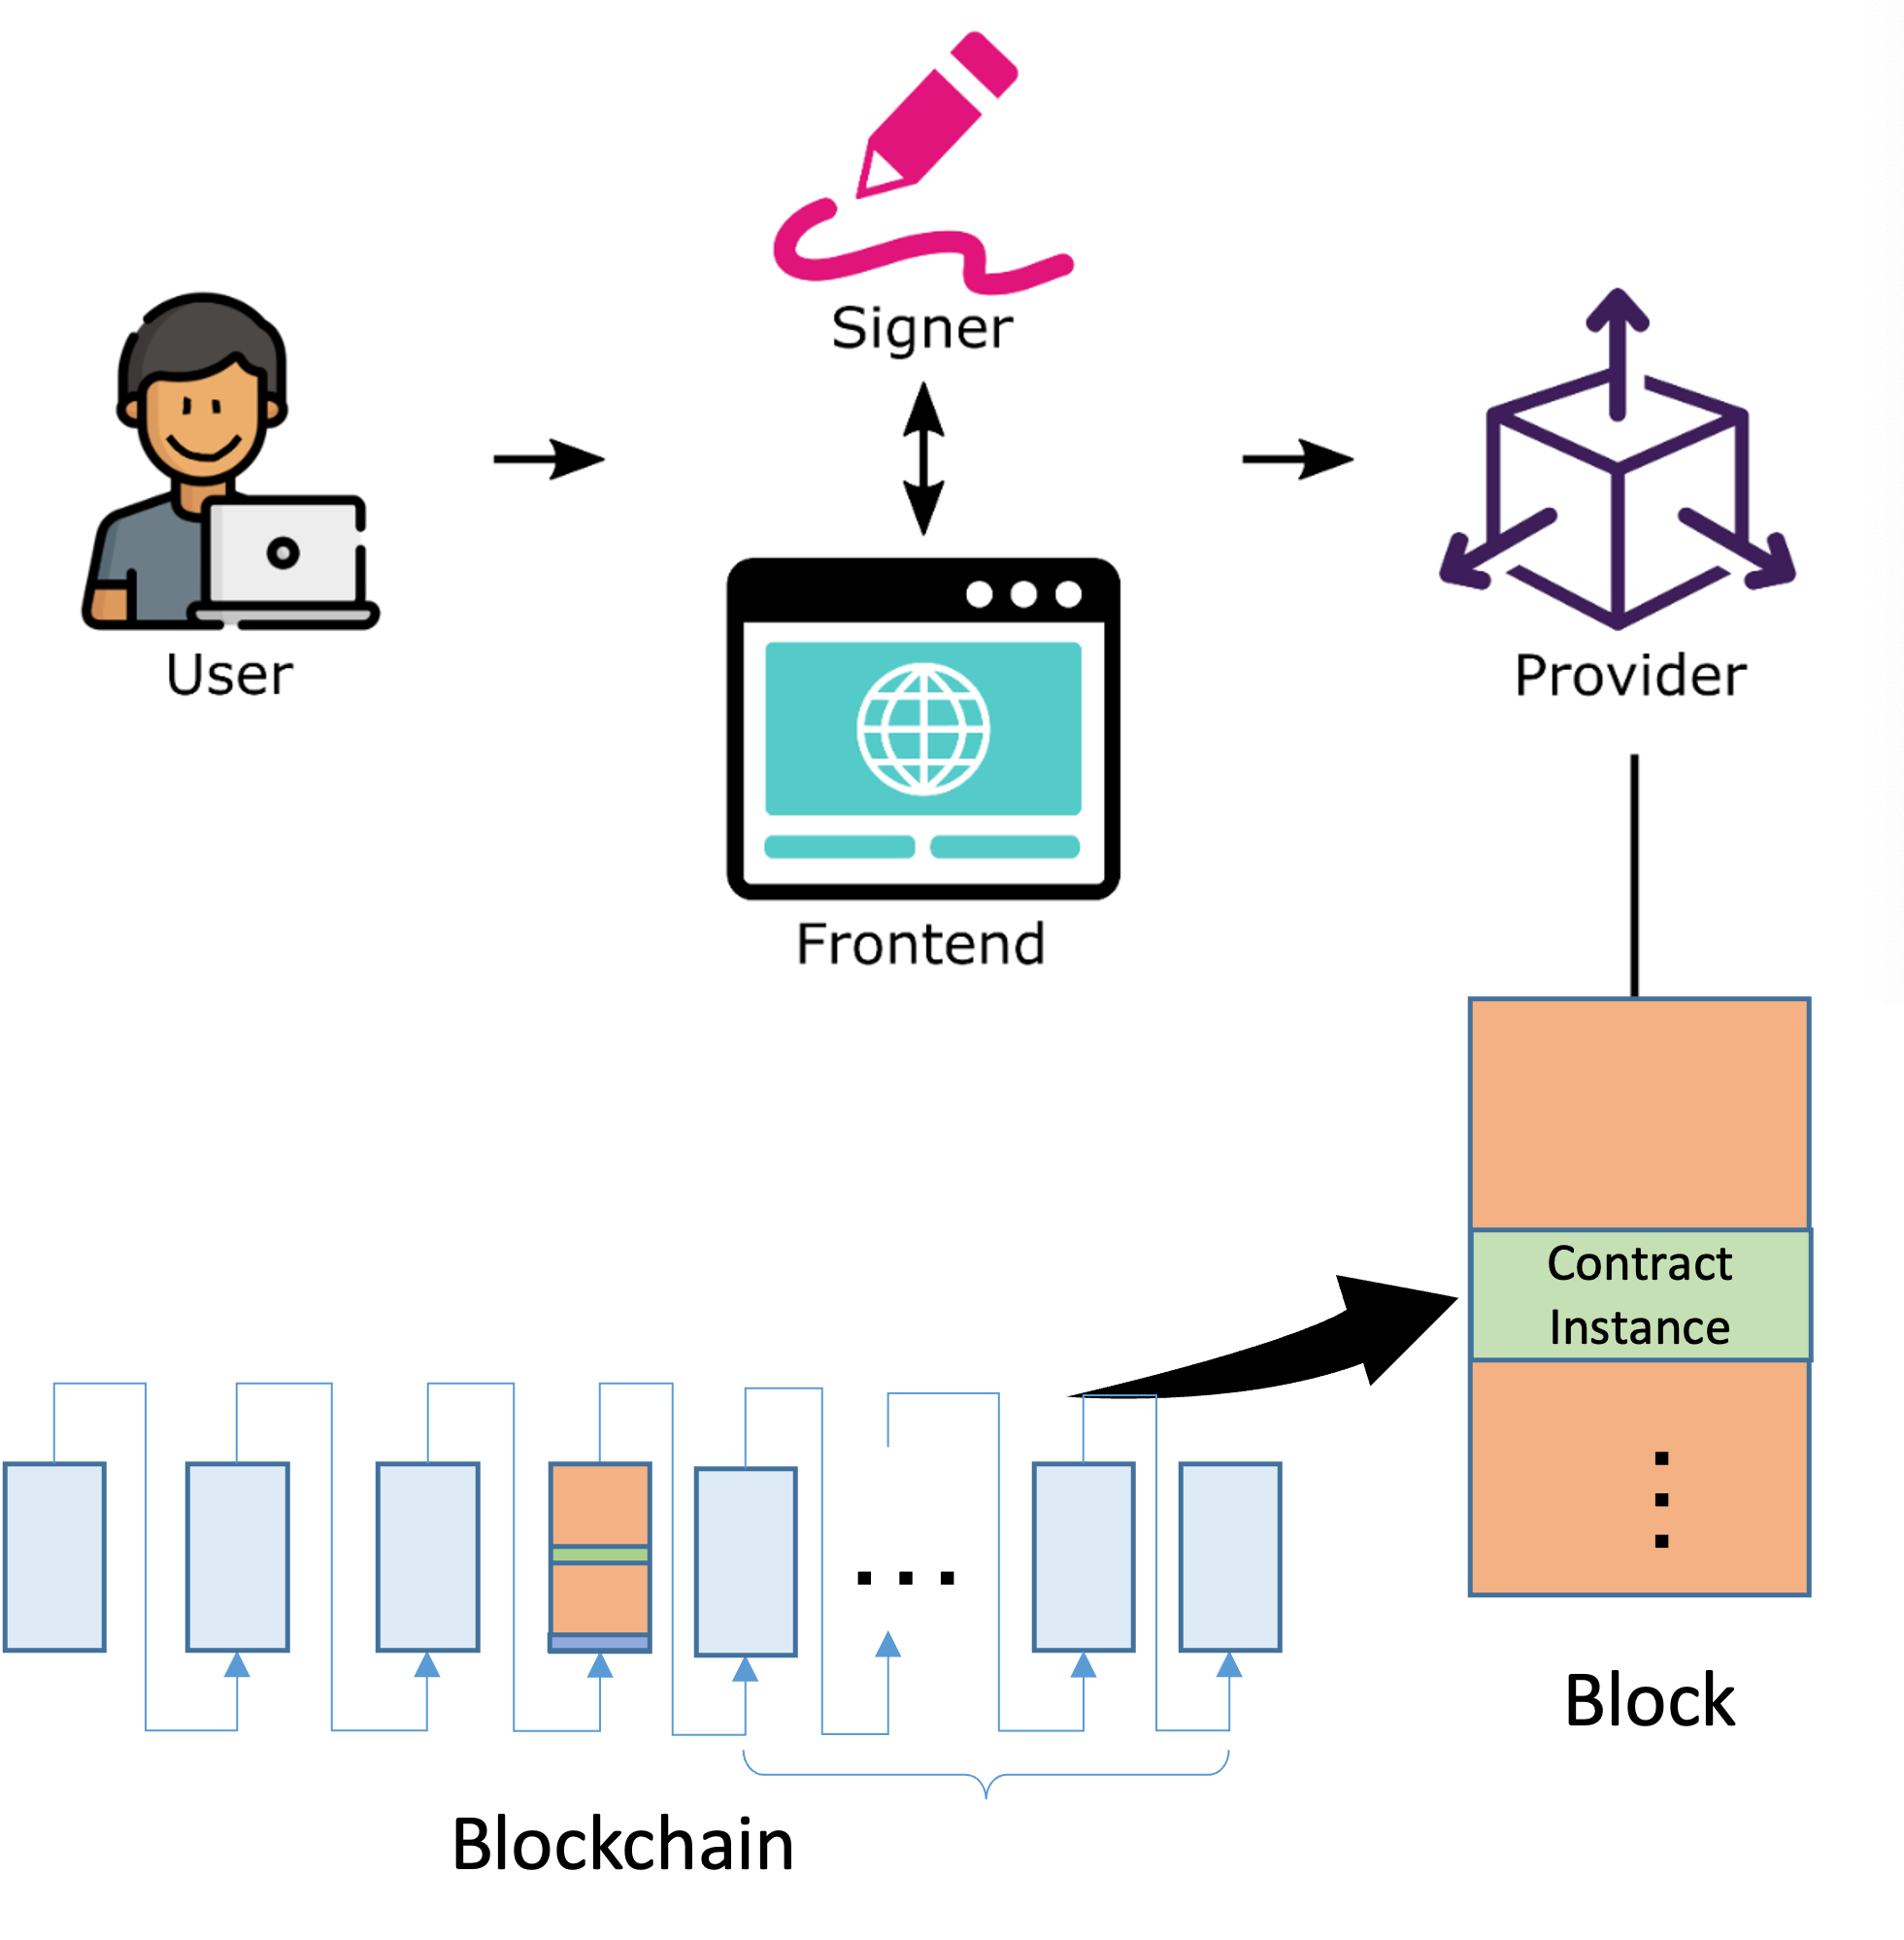
This section could be summarized as the diagram below:

Prepare a Signer and Provider
A signer and a provider must be created before deployment and call. When we are ready to deploy the contract to the testnet/mainnet, we need a real provider like DefaultProvider.
const network = toBitcoinNetwork('fractal-mainnet'); // or toBitcoinNetwork('btc-signet')
const privder = new MempoolProvider(network);
const signer = new DefaultSigner()
The privateKey must have enough coins. Learn how to fund it on a testnet using a faucet.
DefaultSigner is just a Signer provided by sCrypt for testing. In a real production environment (mainnet), you should use UnisatSigner or others.
Contract Deployment
To deploy a smart contract, call its deploy method, like this:
// construct a new instance of `MyContract`
let instance = new MyContract(...initArgs);

// create the covenant that wrap the contract instance
let covenant = Covenant.createCovenant(instance);

// the contract UTXO’s satoshis
const initBalance = 1234;

// build and send tx for deployment
const deployTx = await deploy(signer, provider, covenant, initBalance);
console.log(`Smart contract successfully deployed with txid ${deployTx.id}`);
Contract Call
To facilitate calling a contract's public @method, we have injected a runtime object named methods in your contract class, just call the contract's public method in the invokeMethod callback.
Assume you have a contract like this:
class MyContract extends SmartContract {
  ...
  @method()
  public foo(arg1, arg2) {...}
}

let instance = new MyContract();

let covenant = Covenant.createCovenant(instance)
This function is designed to invoke the corresponding @method of the same name on chain, meaning: calling it will spend the previous contract UTXO in a new transaction. You can call it like this:
const tx = await call(signer, provider, covenant, {
        invokeMethod: (contract: MyContract) => {
            contract.foo(arg1, arg2);
        },
    })
What actually happens during the call is the following:
- Build an unsigned psbt by calling the tx builder for a public
@method. - Use the signer to sign the psbt. Note that
contract.foocould be invoked during this process in order to get a valid unlocking script for the input. - Use the
providerto send the transaction.
Method with Signatures
A contract public @method often needs a signature argument for authentication. Take this Pay To PubKey Hash (P2PKH) contract for example:
export class P2PKH extends SmartContract {
    @prop()
    readonly address: Addr

    constructor(address: Addr) {
        super(..arguments)
        this.address = address
    }

    @method()
    public unlock(sig: Sig, pubkey: PubKey) {
        // make sure the `pubkey` is the one locked with its address in the constructor
        assert(pubKey2Addr(pubkey) == this.address, 'address check failed')

       // make sure the `sig` is signed by the private key corresponding to the `pubkey`
        assert(this.checkSig(sig, pubkey), 'signature check failed')
    }
}
We can call the unlock method like this:
// call
const address = await testSigner.getAddress();
const tx = await call(signer, provider, covenant, {
    invokeMethod: (p2pkh: P2PKH, psbt: IExtPsbt) => {
        // getSig to find a signature
        const sig = psbt.getSig(0, { address: address });
        p2pkh.unlock(sig, PubKey(toXOnly(pubkey, true)));
    }
})

console.log('contract called: ', callTx.getId());
When psbt.getSig is called, the option contains address, requesting a signature against address.
The secound argument is a signature, which can be obtained in a callback function. The function takes a list of signatures requested in address and find the one signature to the right public key/address.
In general, if your @method needs Sig-typed arguments, you could obtain them as follows:
- Ensure the first argument is right input index;
- Ensure that the options contains all public keys/addresses corresponding to these
Sigs;
Example
Here is the complete sample code for the deployment and call of a P2PKH contract.
import { P2PKH } from 'p2pkh'
import * as dotenv from 'dotenv'
import { getDefaultProvider, getDefaultSigner } from './tests/utils/txHelper';
import { call, Covenant, deploy, hash160, IExtPsbt, PubKey, toXOnly, uint8ArrayToHex } from '@scrypt-inc/scrypt-ts-btc';
import { address as Address } from '@scrypt-inc/bitcoinjs-lib';
// Load the .env file
dotenv.config()

async function main() {

    // setup signer
    const signer = getDefaultSigner();

    // setup provider
    const provider = getDefaultProvider();

    // initialize an instance with `pkh`
    const address = await signer.getAddress();
    const pubkey = await signer.getPublicKey();
    const pkh = hash160(uint8ArrayToHex(Address.fromBech32(address).data));

    const p2pkh = new P2PKH(pkh)

    // create covenant
    const covenant = Covenant.createCovenant(p2pkh);

    // deploy the contract, with 1 satoshi locked in
    const deployTx = await deploy(signer, provider, covenant);
    console.log('P2PKH contract deployed: ', deployTx.getId());

    // call
    const callTx = await call(signer, provider, covenant, {
        invokeMethod: (p2pkh: P2PKH, psbt: IExtPsbt) => {
            const sig = psbt.getSig(0, { address: address });
            p2pkh.unlock(sig, PubKey(toXOnly(pubkey, true)));
        }
    })

    console.log('P2PKH contract called: ', callTx.getId());

}


main();
Running the code
The deployment and call code is wrapped into a simple NPM command:
npm run testnet
Make sure you fund your address before running this command. After a successful run you should see something like:
P2PKH contract deployed:  9d4fb64b08f1b716cf32372789db18fcb4f14c86456c1174f22306e71f948e7f
P2PKH contract called:  46fd491febb364bd88c619b54580e15c8b9ab59c329a9b57f7cb7e339d9a1b47
These are the TXIDs of the transaction which deployed the smart contract and then the one which called its method. You can see the transactions using a block explorer.